The following are required:
- Qt Designer
- python-qt4
- pyuic4
- Creating the Interface
Qt Designer appears similar to the Windows Forms designer in Visual Studio, and the concept's roughly the same - there are form elements, and a Signal/Slot editor that seem to provide the handlers for the form objects. To demonstrate an event-driven Python application, we can create a form with just a Close button and Quit option in the toolbar. After setting out the form and elements, it's a good idea to rename everything in the Property Editor, as this makes coding easier. For example,
frmMain for the form,
cmdClose for a Close button and
menuQuit for a Quit menu option.
When the application interface layout is created, it's saved as a
.ui file. This is a variant of XML that defines the interface appearance, element positions, names and layouts. From this,
pyuic4 will generate a Python script:
$pyuic4 -x myFirstForm.ui -o myform.py
The '
-x' option creates the output as an executable file, and running
myform.py gives us a Qt application.
Coding the Events and Event Handlers
The generated
.py file has a class that contains methods for each form element. Although it's possible to add events and handlers here, they'd need to be added each time the form's modified in Qt Designer. Instead, we can create another script (e.g.
main.py) to contain the application logic, referencing the elements class in the forms script.
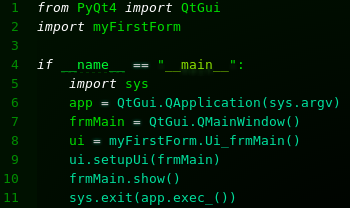
Typically we'd place the events and event handlers in separate functions, with the events calling event handler functions.