From what I’ve seen so far, FreeBSD is almost identical to Linux. The difference is we don’t get everything out of the box, as we would with Ubuntu or Linux Mint. Instead we get a lightweight and efficient operating system to build on.
This post goes through the process of getting FreeBSD running with a full desktop environment, though perhaps not in the most direct way, as I’ve done a bit of guesswork and improvisation to get there. It should take a couple of hours at most, starting with a basic installation disc or ISO.
Essentially what’s happening here are the following steps:
- Install a base system from the disc image.
- Fetch and install X Windows and desktop environment components.
- Configure the operating system to load X Windows and the desktop environment at startup.
Installing the Base System
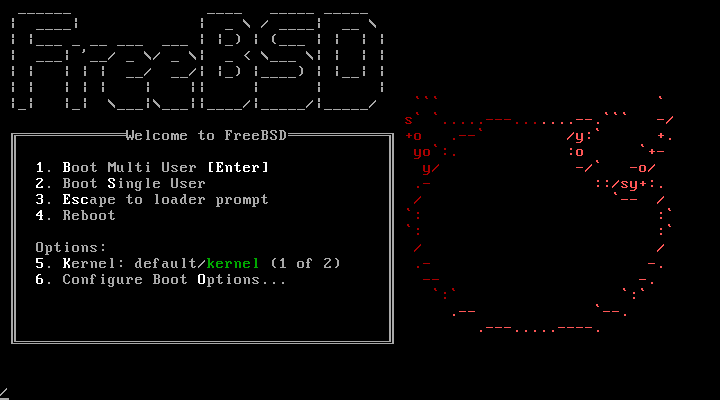
For this I used the i386 ‘disc 1’ ISO file in VirtualBox, but the following should apply when running FreeBSD from a disc on generic hardware. The first thing we get is the boot screen. From the menu select the ‘Boot Multi-user’ option, then at the next menu launch the FreeBSD Installer. Since the installer copies just the base system with a command line interface at this point, it’s fairly quick and straightforward. When prompted, we definitely need to create a second user account.
Reboot the system and login as root. The next stage will require the ‘pkg’ tool to fetch and install other components, so enter the ‘pkg’ command.
#pkg
Since getting a graphical interface working involves modifying configuration files, I installed the nano text editor. This was before I discovered FreeBSD already includes the ‘ee’ editor, which seems just as usable.
#pkg install nano
Now we need to enable certain components, such as dbus, hald and kdm4 (we’ll come to this). The Hardware Abstraction Layer daemon (hald) is used for handling display-related hardware, and dbus is used for inter-process communication.
Edit /etc/rc.conf to add the following lines:
                dbus_enable="YES"
                hald_enable="YES"
                kdm4_enable="YES"
The thing is hald relies indirectly on procfs, the /etc/fstab file should contain the entry for proc:
#nano /etc/fstab
Installing X Server and Desktop Environment
There are some pages on this in the official FreeBSD documentation, but I’ve skipped certain things. The X Window System is the underlying component for rendering windows, desktops and graphical menus, and where most graphics-related issues are fixed later.
First we require X server.
#pkg install xorg
As the status messages indicate, this also fetches and installs the TWM environment. Also required are the X Display Manager (xdm) and Session Manager (xsm).
                #pkg install x11/xdm
                #pkg install x11/xsm
Run ‘X -configure’ and copy the generated file with the following command:
cp /root/xorg.conf.new /etc/X11/xorg.conf
In the new file (/etc/X11/xorg.conf) add the following section:
                Section "Extensions"
                    Option "Composite" "Enable"
                EndSection
Sorting KDE and KDM
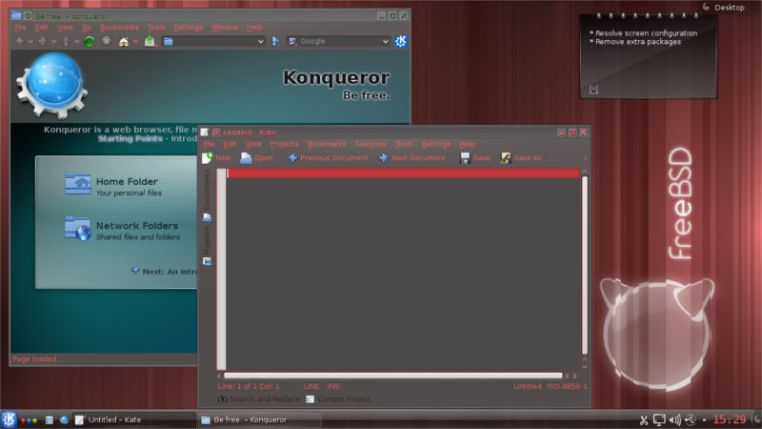
Now we’re ready to install a full desktop environment on this. As with Linux, we have a range of possible environments to choose from. I chose KDE, which gives users something very similar to the Windows 7 desktop.
#pkg install x11/kde4
Roughly 950MB of KDE and KDE-related packages are fetched (many of them we don’t really need), and installation takes up around 3GB. When this is done, we modify /etc/ttys so TTY8 uses KDM instead of XDM:
ttyv8 "/opt/kde/bin/kdm" xterm on secure
I also entered the following to see whether KDM runs as a service at this point.
#service kdm4 start
In the user’s home directory we require a file that starts KDE as the default GUI. Enter the following command:
#nano ~/.xinitrc
And add the following line to the .xinitrc file:
exec /usr/local/kde4/bin/startkde
Then the system can be rebooted.
Fixing the Display Problem
After installing FreeBSD with a desktop environment, the first thing I wanted to fix was the virtual screen size, which was much smaller than the physical screen. I eventually managed it, after several hours’ experimenting and trying
various fixes posted on the Web.
Before getting to that, a fresh installation doesn’t have the ‘
sudo’ program to enable the execution of specific tasks with root privilieges. Switch to another terminal, e.g.
Ctrl+Alt+F4, log in as root, then install ‘
sudo‘.
Then:
#pkg install sudo
Now we need to add the user to the sudoers file, using the visudo command. Unfortunately we must use
vi. All we need to know here is the ‘
I’ key is used for inserting text, and when done the ‘
Esc’ key, followed by the ‘
:wq’ command.
Add something like the following into the file:
michael All=(ALL) ALL
As often happens when installing Linux/UNIX on VirtualBox, and sometimes when installing on physical hardware, the desktop is much smaller than the physical screen.
In this case, I’m guessing the underlying problem was the operating system attempted to detect the video hardware and load the appropriate driver for it. Failing that (because it’s VirtualBox), the operating system falls back to a generic driver module. We need to replace this module with something from the VirtualBox Additions package. The following solution was taken from
the FreeBSD wiki (the last place I looked!).
VirtualBox Additions
To install the VirtualBox Additions:
#sudo pkg install virtualbox-ose-additions-4.3.32
Then enable the VirtualBox guest services by adding the following lines to /etc/rc.conf:
                vboxguest_enable=”YES”
                vboxservice_enable=”YES”
Skip the other steps in the wiki page and go straight to the bit about xorg.conf. The following lines in the Device section are the important ones:
                Identifier "Card0"
                Driver "vboxvideo"
                VendorName "InnoTek Systemberatung GmbH"
                BoardName "VirtualBox Graphics Adapter"
                BusID "PCI:0:2:0"
Hopefully the boot messsages would show the VirtualBox additions being loaded successfully whenever the system is rebooted, and a full size desktop should appear.
Installations without a Desktop Environment
Before resolving the KDE problem, I managed to fix the display size for the command line by playing with the video mode. As far as I can tell, this only works when the generic display driver module’s loaded. The following command displays a list of video modes:
#vidcontrol -i mode
Whichever one of those listed is used is a matter of trial and error, of trying the ones that appear right, with something like:
#vidcontrol MODE_279
When you’ve hit the correct one, the mode can be made persistent by adding the following line to
/etc/rc.conf:
allscreens_flags="MODE_279"
System Security Configuration
Patching, a properrly configured firewall and updated anti-malware protection will prevent 99% of security threats. Fortunately all three can be readily added to a FreeBSD installation, and there are some other native features in this operating system that can provide pretty solid security.
The most important things, in my opinion, are exploit prevention and mitigation – that is, making it hard as possible for something to exploit software vulnerabilities, and restricting what an exploit could do if executed.
Already present in a FreeBSD installation is the ‘
bsdconfig’ utility, which enables low-level configuration changes. The Security and Startup options are the ones we might want to configure, after everything’s set up.
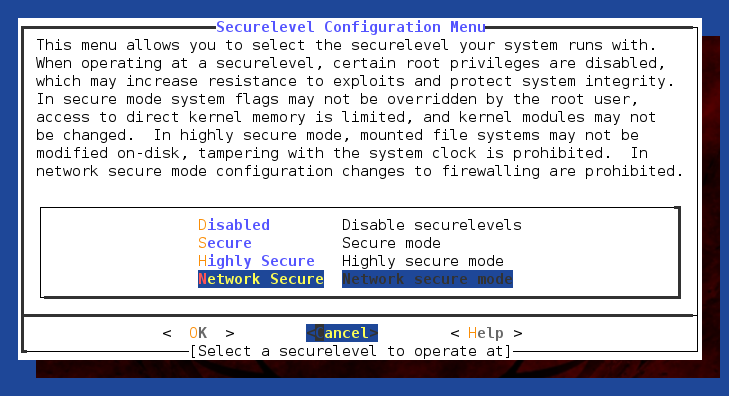
The
Securelevel options are used for limiting the actions that could be performed with root privileges, assuming no malicious program is capable of undoing these configuration changes. In Highly secure mode, the loading/unloading of kernel modules, the mounting of additional filesystems and certain configuration changes are disabled. This could provide an additional safeguard against the installation of kenel-mode rootkits. There is a help page describing what each
Securelevel option does.
Patching
If an anti-malware system has reacted to a malware infection attempt, it typically means a vulnerability has already been exploited and shellcode was executed. Patching known vulnerabilities and removing software we don’t need really is the first line of defence, if the operating system doesn’t have native exploit prevention measures such as
ASLR. The following commands are used to fetch available updates to the base system, and install whatever has been fetched:
                #freebsd-update fetch
                #freebsd-update install
This sorts the updates for the core operating system, but there are also a load of other packages that were added later. The following looks for vulnerability notices associated with installed applications:
#pkg audit -F
Vulnerability disclosures are posted quite regularly, so it makes sense to make periodic checks. To check for packages that could be upgraded to a more recent version:
#pkg version
Another tool we could use for checking for outdated pakages is
portmaster.
#portmaster -a
Exploit Mitigation
PolicyKit/PolKit is something I’d need to look into further, but it seems the rough equivalent of SELinux here. Essentially it checks a request to a privileged process from an unpriviliged process, according to specific policies. The idea is that an exploited or compromised program remains limited by whatever policies are set. A configured PolKit is included as part of the base system, and a GUI for it’s included with KDE by default.
There is a ‘jail’ utility native to the system, which is based on the chroot concept. Essentially this changes the root directory location for a given process, so that it cannot refer to anything beyond it. The FreeBSD jail adds further mechanisms to restrict access to hardware resources from a process in the chroot, so it almost provides a fake environment with predefined resources. For this to work, the FreeBSD jail requires its own jail name, host name and IP address attributes. A jail could be made to resemble a complete FreeBSD system, or a ‘service’ jail dedicated to one or two processes.
We might use this for compiling a new Linux/UNIX system within a pre-existing host installation, and the FreeBSD handbook makes reference to extracting the contents of an ISO file into the /mnt directory.
Anti-Malware
With UNIX-based systems, the anti-malware solutions have the advantage of performing more thorough checks for anything suspicious in the operating system components. With FreeBSD’s package repositories, we have a choice of rkhunter, chkrootkit and clamAV. Each has a different method of looking for activity associated with malicious programs, but generally they check for signs of privilege escalation, replaced binaries and processes being hidden from user space.
It might take a little knowledge and experience to understand the command line output from these programs. Of course, the full output of these programs can be dumped to a text file using a command like:
#rkhunter -c >> scanlog.txt
Since all three employ slightly different methods for uncovering rootkits, best results are gained by running all three separately periodically.
Firewall and Packet Filtering
Packet filtering in FreeBSD (and Linux) happens at the kernel level, with the packets passing through the network interface and then the packet filtering module. I think this is more for FreeBSD boxes on the network perimeter, or even to use a FreeBSD box as a firewall, but it’s not a bad idea to have a host-based setup as threats are stopped at the kernel level.
FreeBSD includes
three firewalls: PF, IPFW and IPF. IPFW seems the default choice here, as there’s already a ruleset file in
/etc/rc.firewall, and it might be easier for most users to simply modify this as needed. There seems to be a disadvantage that IPFW only works with IP addresses, port numbers and transport layers, whereas PF looks at the session layer as well and includes a few other proxying and NAT features.
The firewall profiles are listed in rc.firewall. The alternative for a desktop system is ‘
client’. For an offline machine it might be ‘
closed’. Or we could set this variable to ‘filename’ if we wanted to load all the rules from elsewhere. To list the currently applied firewall rules:
#ipfw list
Then, if any changes were made and the ruleset needs reloading:
#service ipfw restart
inetd
Slightly related to the packet filtering and firewall features, FreeBSD’s
repositories include xinetd, which can replace the pre-installed
inetd. These programs listen for incoming network traffic, and starts a predefined server process to handle requests for whichever port, while applying any relevant policies. This ensures the right programs respond to incoming requests, and to prevent servers being misused. For example, we might want Apache to handle incoming traffic on ports 80 and 443 only, and to limit the number of session attempts for each IP address.
The rules are defined in
/etc/inetd.conf, and the port-service mappings in
/etc/services.